Overview
Thenao test command allows you to measure your agent’s performance on a set of unit tests created by you. It’s meant to help you monitor and improve your context’s quality over time.
nao test is your offline eval: a fixed suite you run before shipping and in CI to catch regressions against a benchmark you control. Its online counterpart is Recommendations, which mines real production usage to surface the gaps you didn’t think to test. Use both to close the feedback loop between shipping context and improving it.
nao test
Thenao test command runs unit tests from your tests/ folder, executes them against your agent, and compares results to verify correctness.
Create unit tests
Create atests/ folder in your project root:
tests/ folder. Test files should have a .yml or .yaml extension.
Test files follow this template:
name: A descriptive name for the testprompt: The question or prompt to testsql: SQL query which produces the right data
Launch nao test command
Before runningnao test:
- Start the nao chat server (for example with
nao chator your usual local setup) so that the backend API is available. - On the first
nao testrun, the CLI will prompt you to log in in your browser — use the same account you use in the local nao chat interface, so tests run under the same project and permissions.
- Discover all
.ymland.yamlfiles in thetests/folder - Run each test against the default model (
openai:gpt-4.1) - Display results in a summary table
- Save detailed results to
tests/outputs/results_TIMESTAMP.json
provider:model_id
Run tests in parallel:
nao test run opens a browser to log in. For CI pipelines, pass credentials directly so the run never blocks on a prompt:
Test mode behavior
Whennao test runs a prompt, the agent operates in test mode. In this mode the clarification tool is removed from the agent’s toolset, so the agent cannot ask follow-up questions. Instead, it makes reasonable assumptions or states that it cannot answer. This prevents tests from hanging on a clarification prompt and ensures every test produces a deterministic result.
Interactive chat is unaffected: the clarification tool remains available in normal conversations.
How It Works
-
Test Discovery: Scans the
tests/folder for.ymland.yamlfiles -
Test Execution: For each test:
- Sends the prompt to your agent in test mode (clarification disabled, see above)
- Captures the agent’s full conversation history, tool calls, and response text
-
Data Verification:
-
Extract actual data: a prompt is sent to the LLM with the full conversation history, asking it to extract the final answer as structured data.
The extraction prompt is: - The LLM responds with structured data formatted as a table matching the expected columns.
-
Execute expected SQL: the
sqlquery from your test file is executed against your database to get the expected results - Compare data: the agent answer’s data and expected data (from SQL execution) are compared
-
Extract actual data: a prompt is sent to the LLM with the full conversation history, asking it to extract the final answer as structured data.
-
Data Comparison Process:
- Normalize datasets: Both datasets are converted to DataFrames and normalized (resets index, infers types, and sorts columns alphabetically)
- Ignore row order: Rows are sorted by all columns before comparison so equivalent results with different row order still pass
- Row count match:If row count doesn’t match, they are not compared
- Exact match: First attempts exact equality comparison
- Approximate match: For numeric columns, uses numpy’s
allclosewith tolerance (relative tolerance: 1e-5, absolute tolerance: 1e-8) to handle floating-point differences - Diff generation: If both comparisons fail, generates a detailed diff showing where values differ
-
Result Collection: Collects metrics including:
- Pass/fail status of the data diff
- Token usage and costs (inputs and outputs of the LLM)
- Execution duration
- Tool call count
Test Outputs
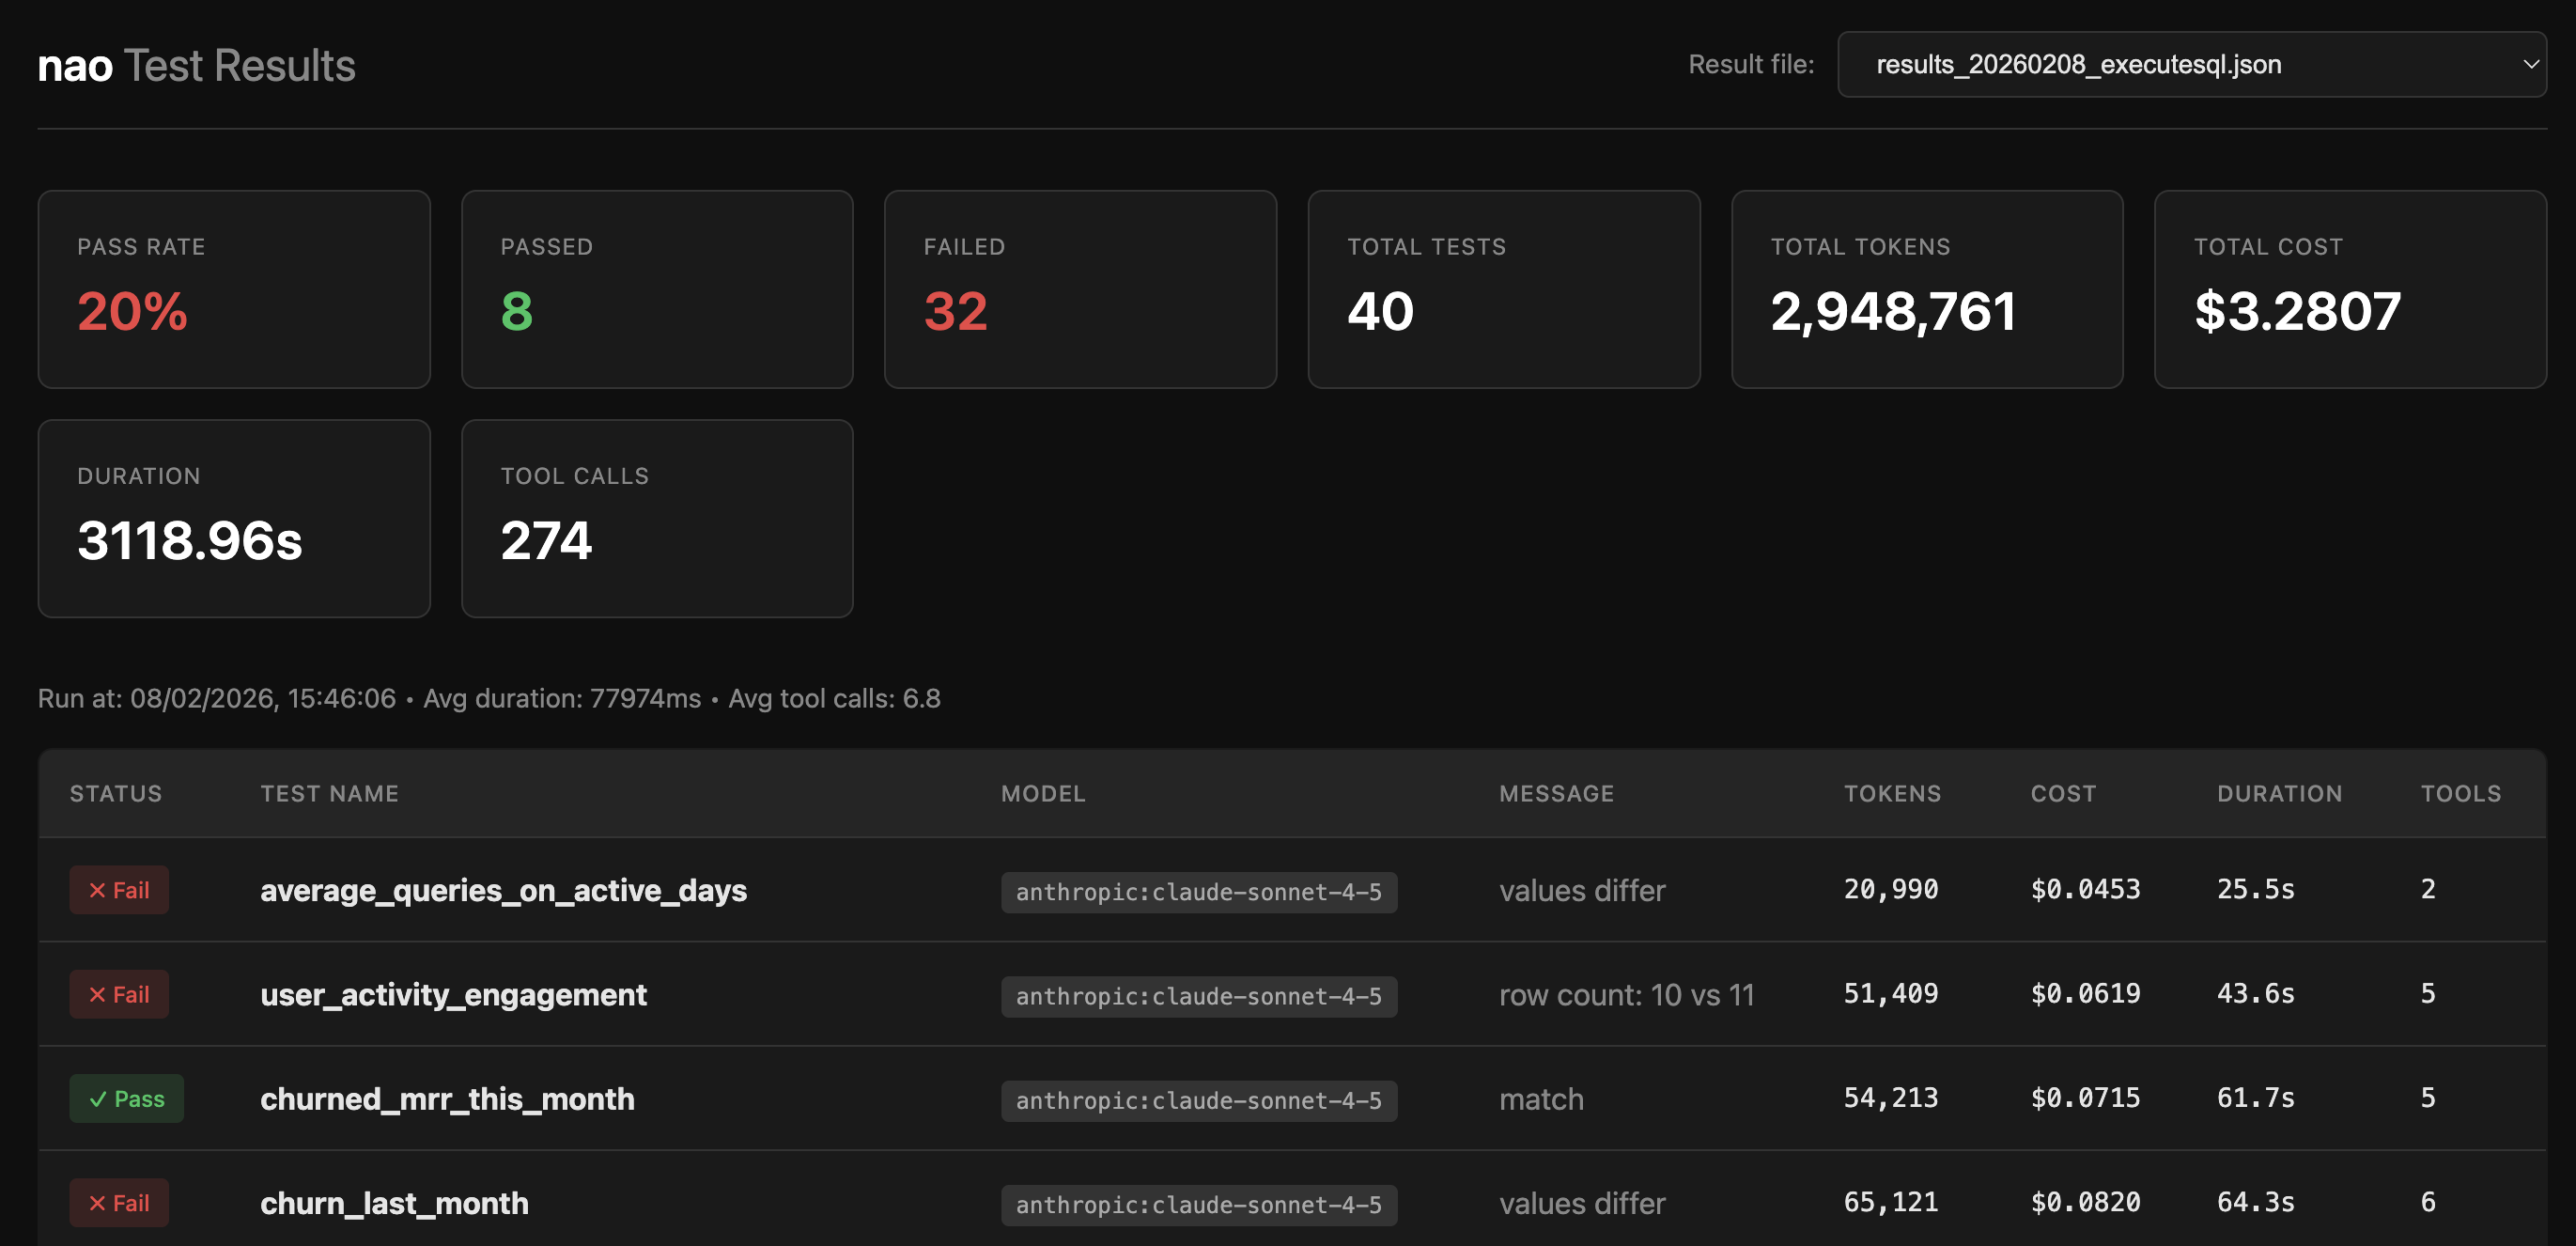
Console Output The command displays a summary table with:- Test name
- Model used
- Pass/fail status
- Message (e.g., “match”, “values differ”)
- Token usage
- Cost
- Execution time
- Tool call count
- A final summary with total passed/failed counts

tests/outputs/results_TIMESTAMP.json:
nao test server
Thenao test server command starts a web server to explore test results in a visual interface.
The test server provides:
- Summary Dashboard: Overview cards showing pass rate, total tests, tokens, costs, and duration
- Results Table: Interactive table of all test runs with status, metrics, and details
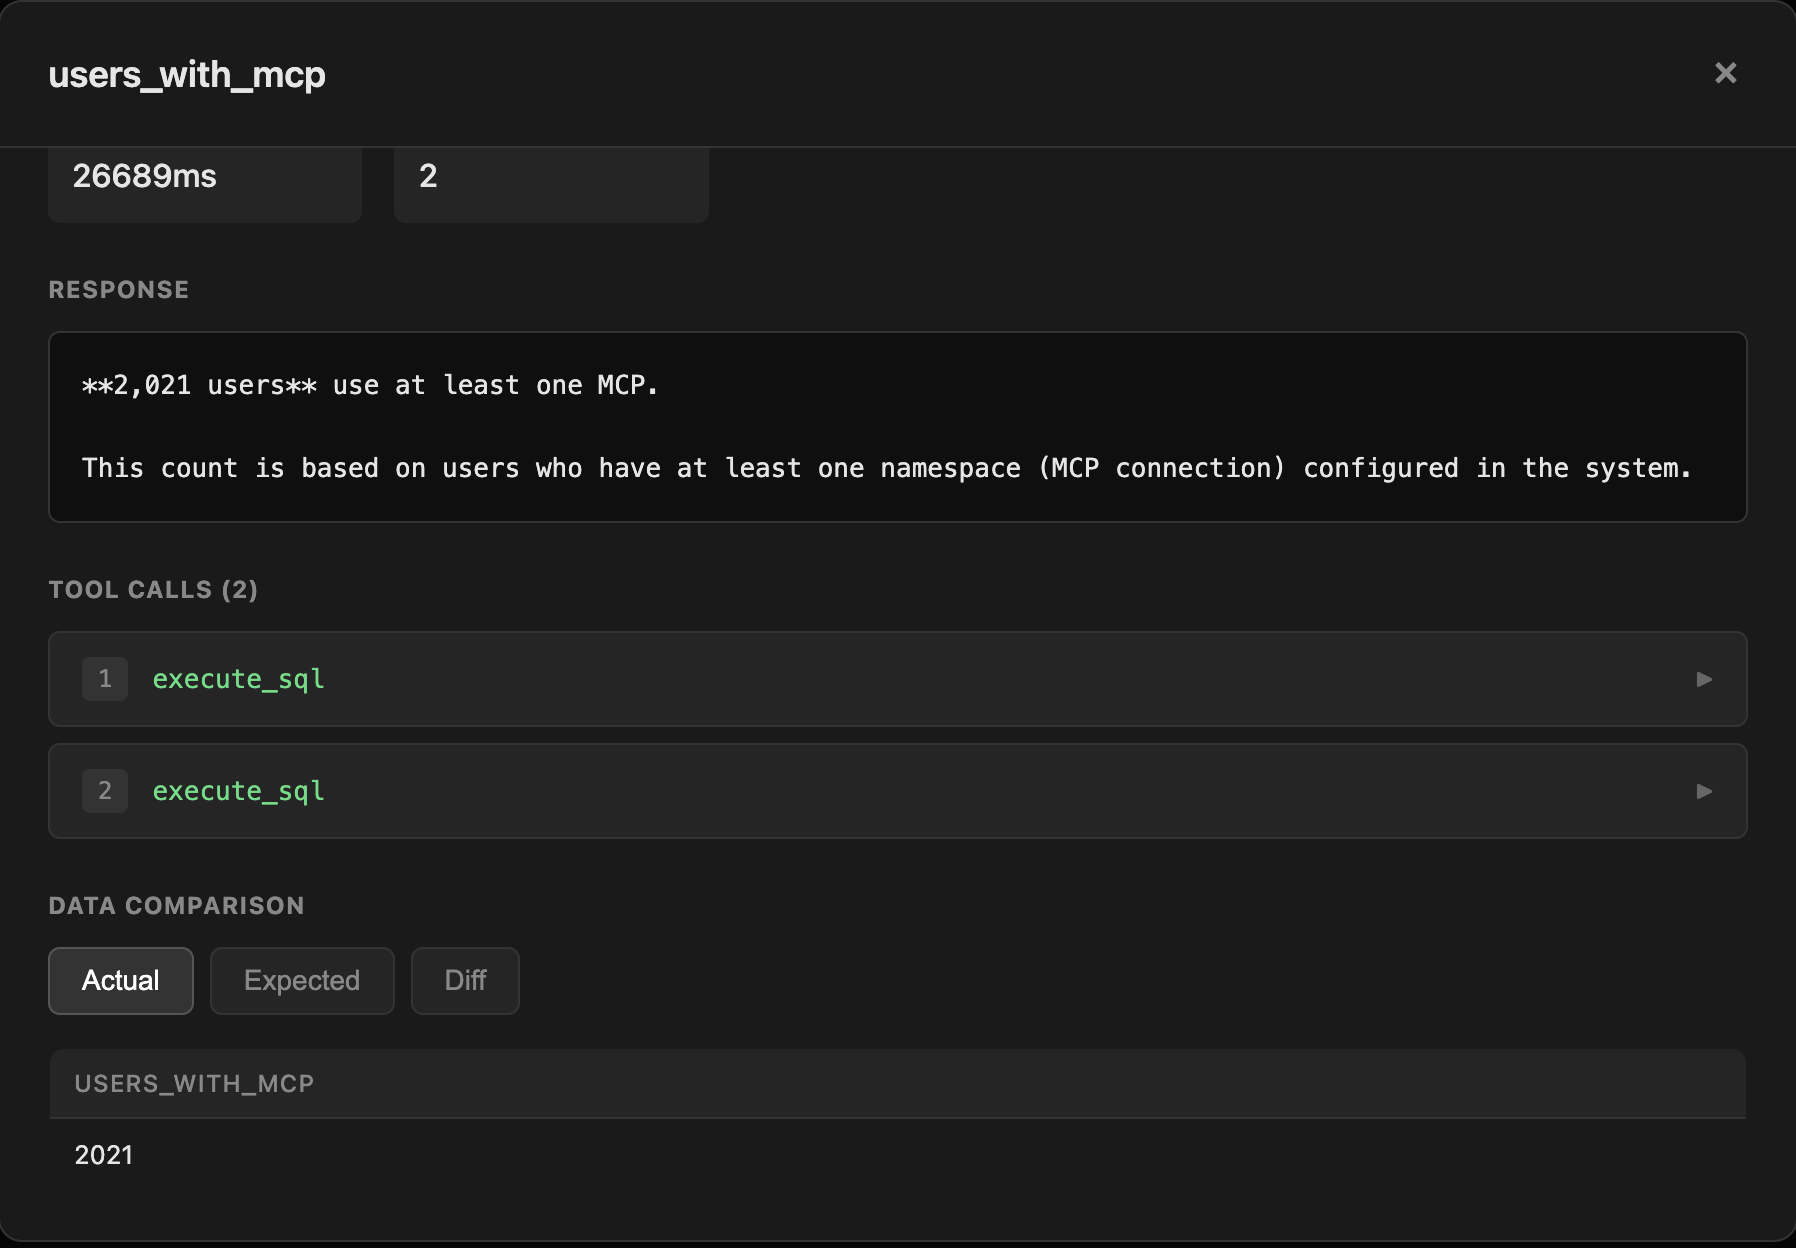
- Detailed View: Click any test to see:
- Full response text
- Tool calls with arguments and results
- Data comparison (actual vs expected)
- Diff view for failed tests
- Performance metrics
http://localhost:8765
Best Practices
Creating Effective Tests
- Start with critical queries: Test the most important questions your users ask
- Cover edge cases: Include tests for boundary conditions and complex scenarios
- Keep tests focused: Each test should verify one specific behavior
- Avoid overfitting and leakage: Avoid including exact answers or overly specific details in your context that would allow the agent to “cheat” by pattern matching rather than actually understanding the context.
Integrating into Workflow
- Version control: Commit your
tests/folder to git - CI/CD integration: Run tests automatically on context changes
- Regular evaluation: Run tests weekly or after major context updates
- Track trends: Monitor pass rates and costs over time
Context Engineering Playbook
Learn how to integrate testing into your context engineering workflow