> ## Documentation Index
> Fetch the complete documentation index at: https://docs.getnao.io/llms.txt
> Use this file to discover all available pages before exploring further.
# Deployment Guide
> Deploy nao with Docker on your own cloud infrastructure
This is a 5 steps guide to create a nao context project, and deploy nao chat UI in your own infrastructure.
## Step 1: Create your nao context repository
**1. Create a new folder / repository and initialize a nao project**
```bash theme={null}
nao init
```
Run a first nao sync if you want to start populating content in your repo:
```bash theme={null}
nao init
```
**2. In `nao_config.yaml`, replace your secrets by environment variables**
Instead of hard‑coding credentials (service account keys, API tokens, database passwords) in your config file, reference them via environment variables.\
This keeps sensitive values out of Git, makes it easier to rotate keys, and lets you reuse the same config across local, staging, and production.
Example:
```yaml theme={null}
databases:
- name: bigquery-prod
templates:
- columns
- preview
- query_history
include: []
exclude: []
type: bigquery
project_id: nao-production
dataset_id: prod_silver
credentials_json: {{ env('GCP_SERVICE_ACCOUNT_KEY_JSON') }}
location: EU
```
You’ll later provide `GCP_SERVICE_ACCOUNT_KEY_JSON` via your deployment platform (for example, as a Secret in Google Secret Manager wired to an env var in Cloud Run).
**3. Init a git repository from your context folder**
Versioning your nao project in Git lets you review changes to context, roll back safely, and collaborate with your team using pull requests.
It also allows your deployed nao chat to directly sync with the contet in your GitHub repository.
```bash theme={null}
git init
git add .
git commit -m "Initial nao project"
```
Learn how to turn your nao project into a GitHub repo and follow best practices
## Step 2: Create Dockerfile
Create a `Dockerfile` in your repository, using the official [`getnao/nao` image](https://hub.docker.com/r/getnao/nao) as the base:
```dockerfile theme={null}
FROM getnao/nao:latest
# Copy your project files
COPY . /app/project/
# Set working directory
WORKDIR /app/project
```
Create a `.dockerignore`:
```text theme={null}
.env
venv/
.gitignore
.DS_Store
```
Commit and push the created files.
### Alternative: use `NAO_CONTEXT_GIT_URL` instead of baking the project
If your nao context already lives in a Git repository, you don't strictly need to copy the project into the container image.\
Instead, you can point the runtime to your Git repo via the `NAO_CONTEXT_GIT_URL` environment variable and let the container clone it on startup.
At a high level:
* **Image**: use the stock `getnao/nao` image (or the Dockerfile above without the `COPY` step)
* **Git repository**: the same repo you configured in `nao_config.yaml` / the [Repositories](/nao-agent/context-builder/repos) docs
* **Environment variable**: set `NAO_CONTEXT_GIT_URL` to the HTTPS URL of your context repository
Example environment variable value:
```bash theme={null}
NAO_CONTEXT_GIT_URL=https://github.com/your-org/your-nao-context.git
```
When this variable is set, the container will clone that repository into the default project path at startup, so you don't have to build a custom image just to include your context code.
#### Cloning over SSH
If `NAO_CONTEXT_GIT_URL` uses an SSH URL (`git@...` or `ssh://...`), set `NAO_CONTEXT_GIT_SSH_KEY` to the private deploy key. The container writes the key to a temporary file and clones with strict host key checking enabled.
Host keys for `github.com` and `bitbucket.org` are pre-pinned in the image, so SSH clones from GitHub and Bitbucket work without any extra setup. Other Git hosts are not pre-pinned and will fail the host key check.
You can still combine this with Git‑based deployments (for example Cloud Run building from your repo): in that case the Git repository is both the build source and the runtime context, and `NAO_CONTEXT_GIT_URL` makes the linkage explicit.
#### Authenticate with a GitHub deploy key (SSH)
For private repositories, use an SSH deploy key instead of a personal access token. nao clones context from both **GitHub** and **Bitbucket**. Generate an `ed25519` key pair, add the public key as a deploy key on the GitHub or Bitbucket repo (read-only is enough), and pass the private key through `NAO_CONTEXT_GIT_SSH_KEY`:
```bash theme={null}
NAO_CONTEXT_GIT_URL=git@github.com:your-org/your-nao-context.git
NAO_CONTEXT_GIT_SSH_KEY="-----BEGIN OPENSSH PRIVATE KEY-----
...
-----END OPENSSH PRIVATE KEY-----"
```
For HTTPS auth with a personal access token, use `NAO_CONTEXT_GIT_TOKEN` instead:
```bash theme={null}
NAO_CONTEXT_GIT_URL=https://github.com/your-org/your-nao-context.git
NAO_CONTEXT_GIT_TOKEN={{ secret_pat }}
```
The container picks the auth scheme from the URL: `git@…` / `ssh://…` requires `NAO_CONTEXT_GIT_SSH_KEY`, `https://…` accepts an optional `NAO_CONTEXT_GIT_TOKEN`. GitHub and Bitbucket host keys are pre-pinned in the entrypoint, so SSH connects to either without a known-hosts prompt.
#### Pick a branch or subpath
Two more environment variables let you scope what the container clones:
* `NAO_CONTEXT_GIT_BRANCH` - branch to check out (defaults to `main`).
* `NAO_CONTEXT_GIT_SUBPATH` - clone only a subdirectory of the repo via sparse checkout. Useful when your nao project lives next to other code in a monorepo.
```bash theme={null}
NAO_CONTEXT_GIT_URL=git@github.com:your-org/data-platform.git
NAO_CONTEXT_GIT_BRANCH=production
NAO_CONTEXT_GIT_SUBPATH=tools/nao
NAO_CONTEXT_GIT_SSH_KEY={{ secret_ssh_key }}
```
Add `NAO_CONTEXT_SOURCE=git` to mark the deployment as the owner of this setup: **Settings -> Git** then shows a read-only summary instead of the repository connection wizard. See [Deployment-managed context files](/nao-agent/self-hosting/context-source).
## Step 3: Create a PostgreSQL database
1. Create a PostgreSQL instance - here I'm using Cloud SQL.
2. Allow unencrypted network traffic (or configure SSL).
3. Enable **Private API** connections.
4. Note your connection string / instance connection name.
## Step 4: Deploy nao on your cloud infrastructure
In this guide we’ll use **Google Cloud Run** as a concrete example, but the same pattern applies to other container platforms (ECS, Kubernetes, etc.).\
You’ll build a Docker image from your nao project and deploy it to Cloud Run, connect it to a managed PostgreSQL instance (Cloud SQL), and load secrets via Google Secret Manager.
### 4.1 Configure Environment Variables
Create secrets in Google Secret Manager for all sensitive values:
* `OPENAI_API_KEY` / `ANTHROPIC_API_KEY`
* `GCP_SERVICE_ACCOUNT_KEY_JSON` (full JSON content of the BigQuery service account, or other warehouse provider secrets)
* `DB_URI` with your PostgreSQL URI – used for storing your app DB. For example:
```text theme={null}
postgres://[user_name]:[password]@[host]:[port]/[database]
```
* `BETTER_AUTH_SECRET` – a long random string used to sign authentication sessions. Generate one with:
```bash theme={null}
openssl rand -base64 32
```
**This is critical.** If you don't set `BETTER_AUTH_SECRET` to a stable value, a new secret will be generated on every container restart, which invalidates all existing sessions and forces every user to sign in again after each redeploy or restart. Generate the value **once**, store it in Secret Manager, and reuse it across deployments.
* Any other secrets used in `nao_config.yaml` (e.g. Notion key)
#### SMTP for transactional email
SMTP is what nao uses for any outbound email: user invitations, forgot-password reset links, and automations that deliver their output by email. It is optional. If you do not configure it, nao still runs, but those email features are unavailable.
Set the variables below to enable email. Email stays disabled unless `SMTP_HOST`, `SMTP_MAIL_FROM`, and `SMTP_PASSWORD` are all set.
| Variable | Required | Description |
| ---------------- | -------- | ----------------------------------------------------------------------- |
| `SMTP_HOST` | yes | SMTP server hostname |
| `SMTP_MAIL_FROM` | yes | From address on outgoing emails |
| `SMTP_PASSWORD` | yes | SMTP password, store it as a secret |
| `SMTP_PORT` | no | Defaults to `587` |
| `SMTP_SSL` | no | Set to `true` for an implicit TLS connection |
| `SMTP_USER` | no | SMTP authentication username. Falls back to `SMTP_MAIL_FROM` when unset |
Set `SMTP_USER` when your provider issues an SMTP username that is not the From address. AWS SES is the common case: it gives you a generated IAM SMTP username, while the From address has to be a verified identity on your domain.
```bash theme={null}
SMTP_HOST=email-smtp.eu-west-1.amazonaws.com
SMTP_PORT=587
SMTP_USER=AKIAIOSFODNN7EXAMPLE
SMTP_MAIL_FROM=nao@your-company.com
```
For providers where the login is the same as the From address, leave `SMTP_USER` unset and nothing changes.
### 4.2 Configure Cloud Run service
1. Create a new Cloud Run service.
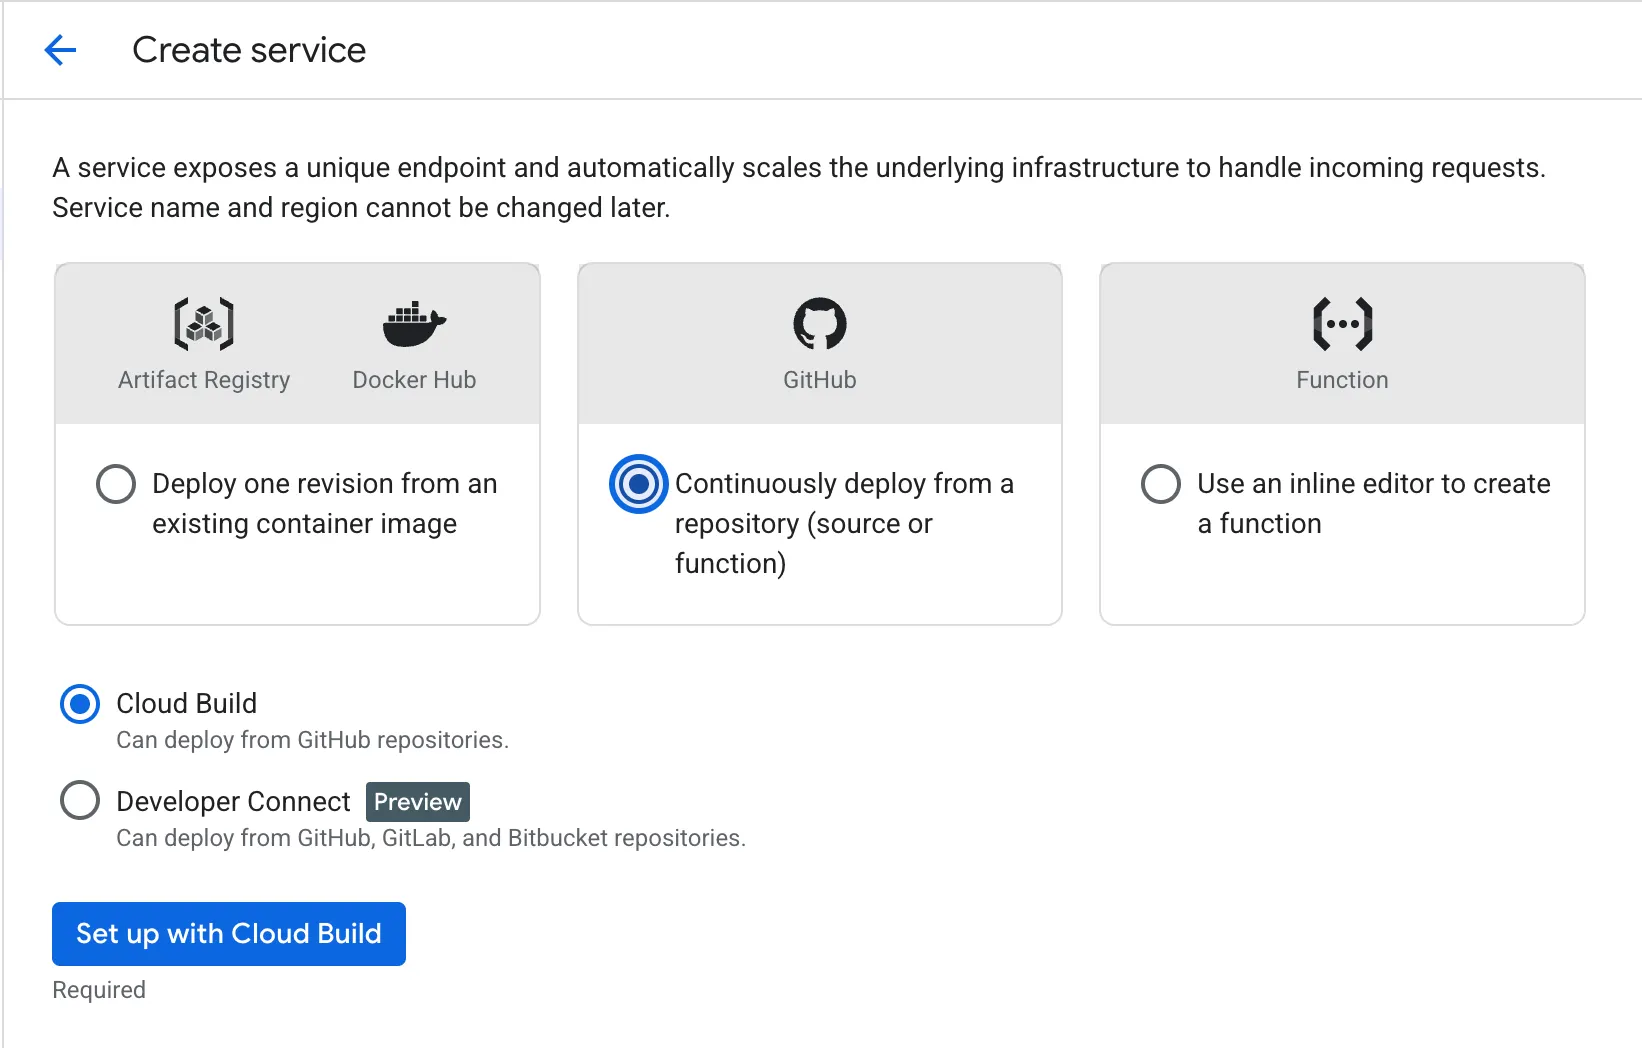
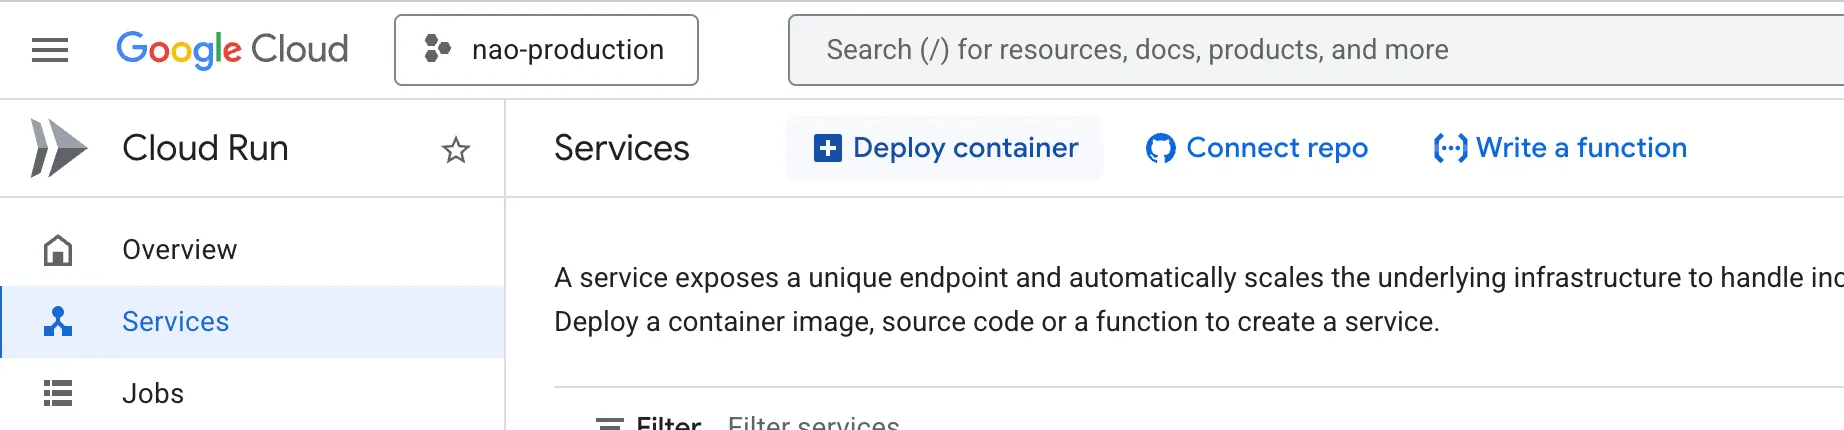 2. Use your GitHub repository as the source and set up Cloud Build to build the Dockerfile.
Create service from a GitHub repository.
2. Use your GitHub repository as the source and set up Cloud Build to build the Dockerfile.
Create service from a GitHub repository.
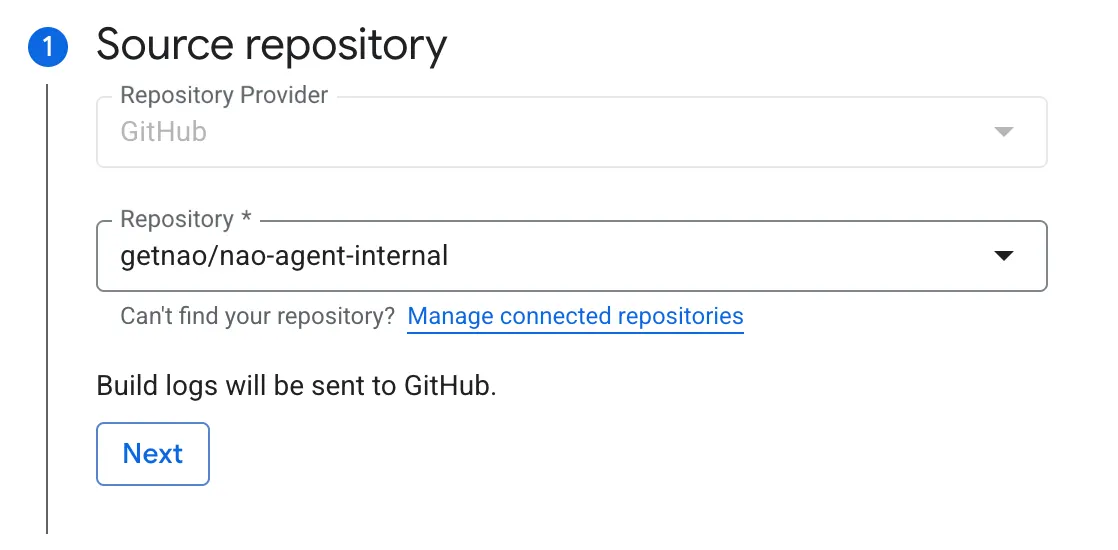
 Choose your context Git Repository.
 Setup synchronization with your main branch.
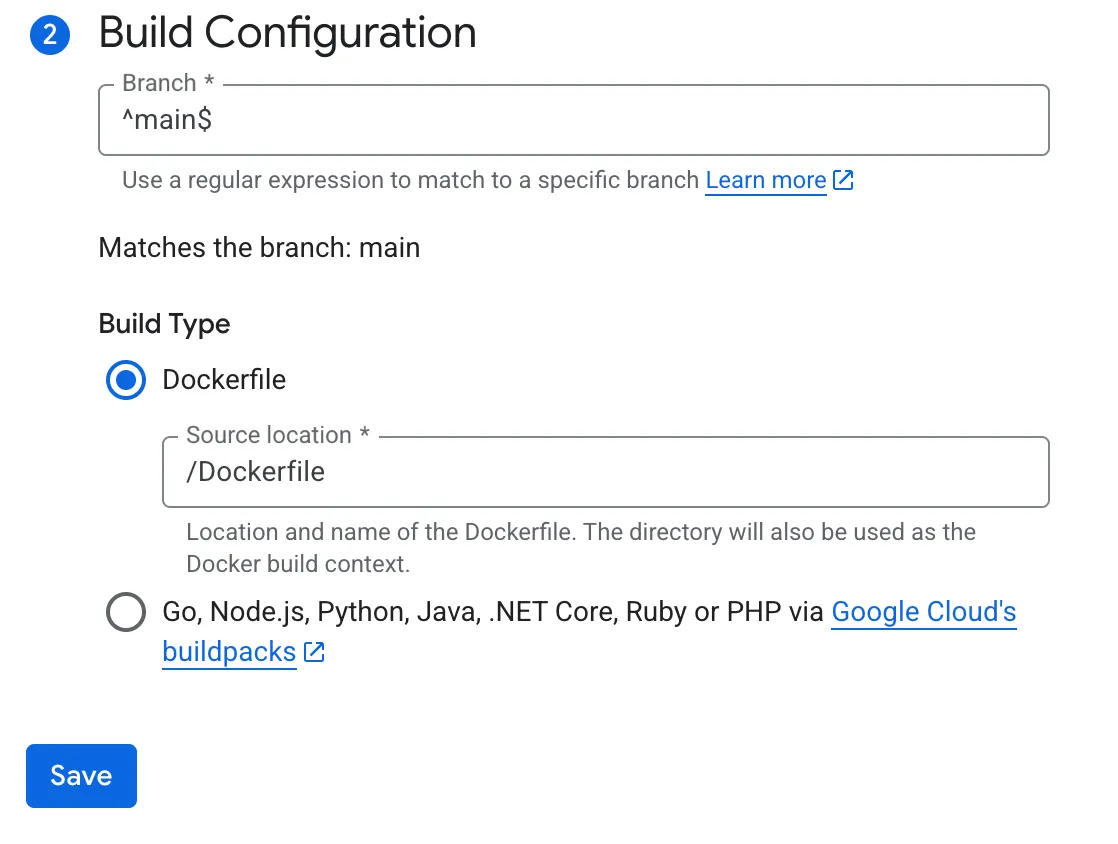 For Cloud Run deployments sourced from GitHub, Cloud Build will automatically rebuild and redeploy on each push to the configured branch.
So your context will always be up to date with the context in the main branch.
3. In the service configuration, add these configurations:
**Container:**
Container port: `5005`
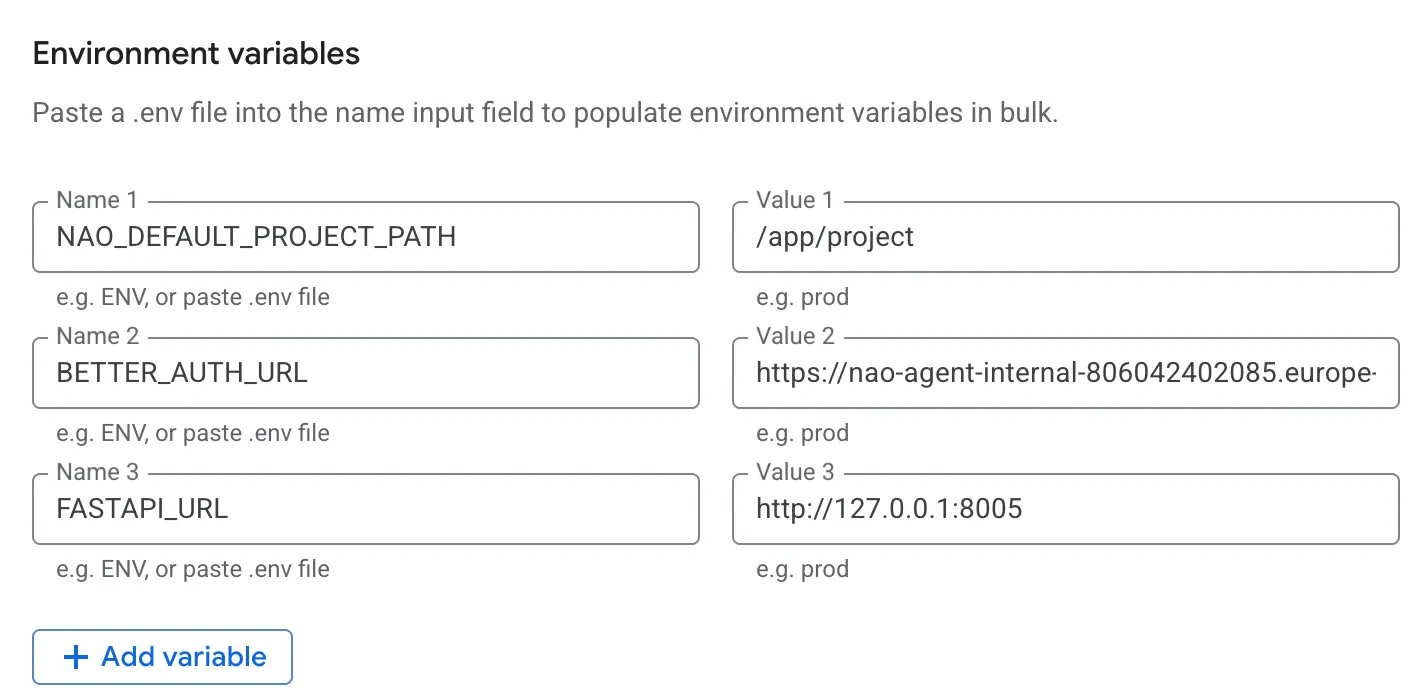
**Environment variables:**
```bash theme={null}
NAO_DEFAULT_PROJECT_PATH=/app/project
BETTER_AUTH_URL=https://placeholder.run.app # will be updated after first deploy
```
For Cloud Run deployments sourced from GitHub, Cloud Build will automatically rebuild and redeploy on each push to the configured branch.
So your context will always be up to date with the context in the main branch.
3. In the service configuration, add these configurations:
**Container:**
Container port: `5005`
**Environment variables:**
```bash theme={null}
NAO_DEFAULT_PROJECT_PATH=/app/project
BETTER_AUTH_URL=https://placeholder.run.app # will be updated after first deploy
```
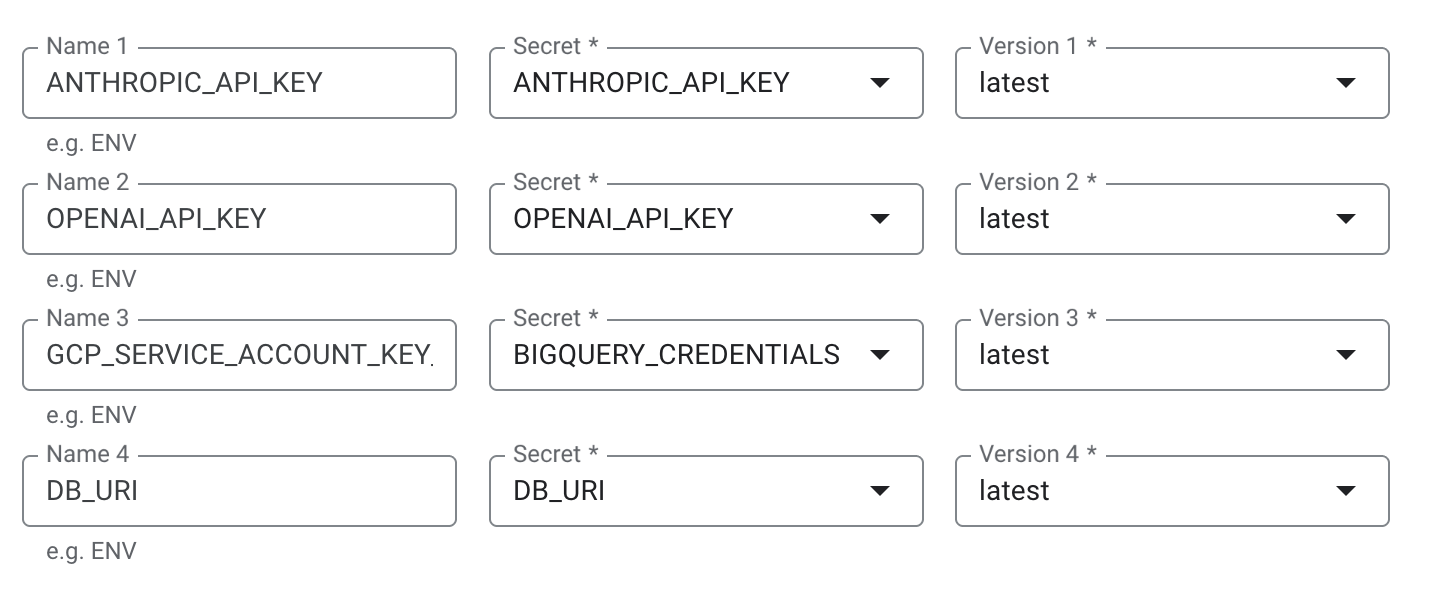
 **Secrets (from Secret Manager):**
* `OPENAI_API_KEY` / `ANTHROPIC_API_KEY`
* `GCP_SERVICE_ACCOUNT_KEY_JSON`
* `DB_URI`
* `BETTER_AUTH_SECRET` – wire it from Secret Manager so the same value is reused across every revision. Without this, users get signed out on every restart.
**Secrets (from Secret Manager):**
* `OPENAI_API_KEY` / `ANTHROPIC_API_KEY`
* `GCP_SERVICE_ACCOUNT_KEY_JSON`
* `DB_URI`
* `BETTER_AUTH_SECRET` – wire it from Secret Manager so the same value is reused across every revision. Without this, users get signed out on every restart.
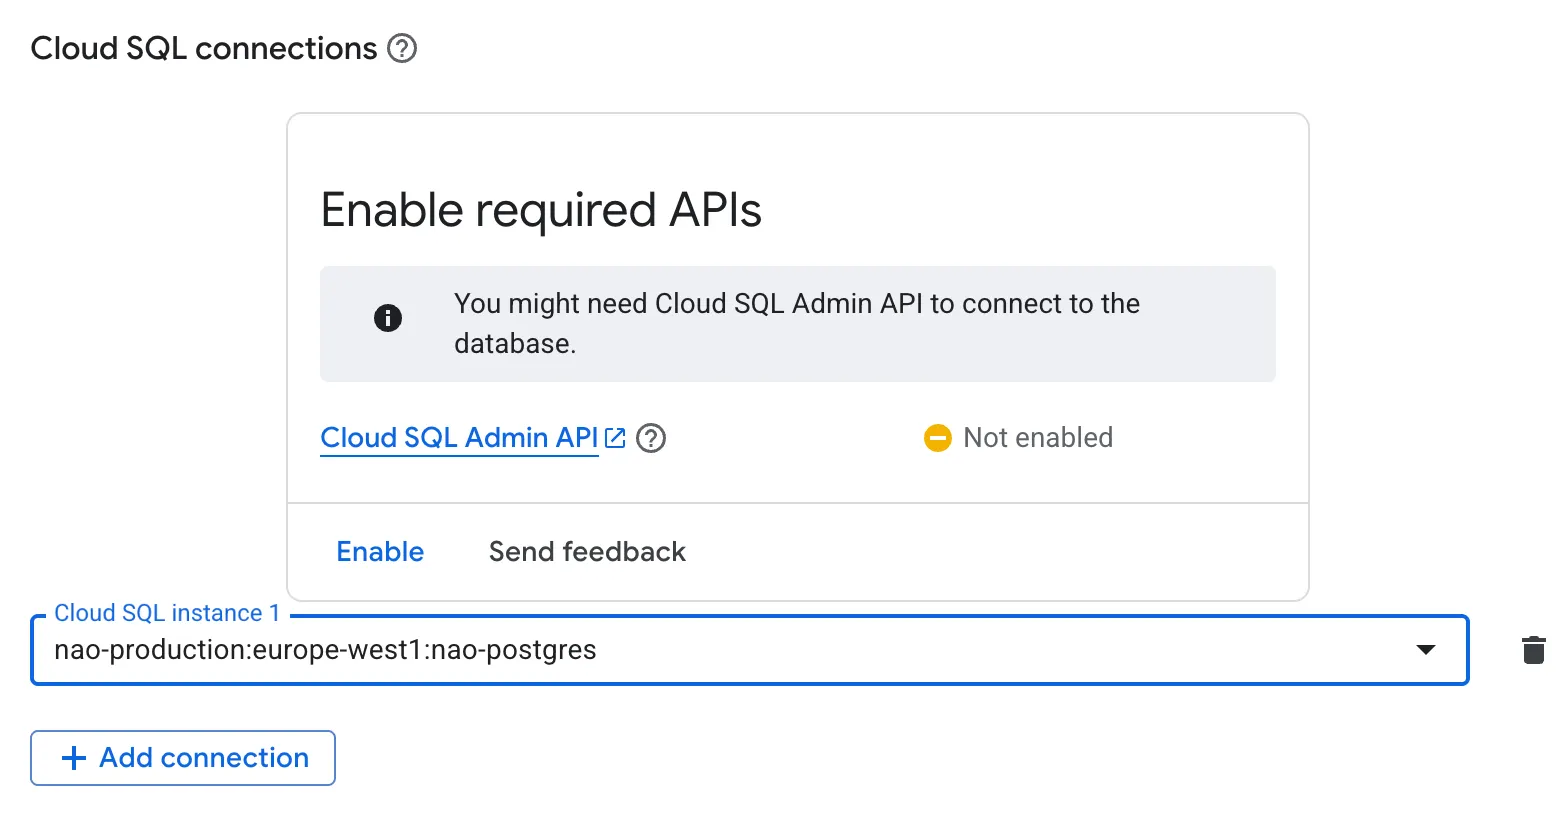
 **Connections:**
* Add Cloud SQL connection to your PostgreSQL instance.
**Connections:**
* Add Cloud SQL connection to your PostgreSQL instance.
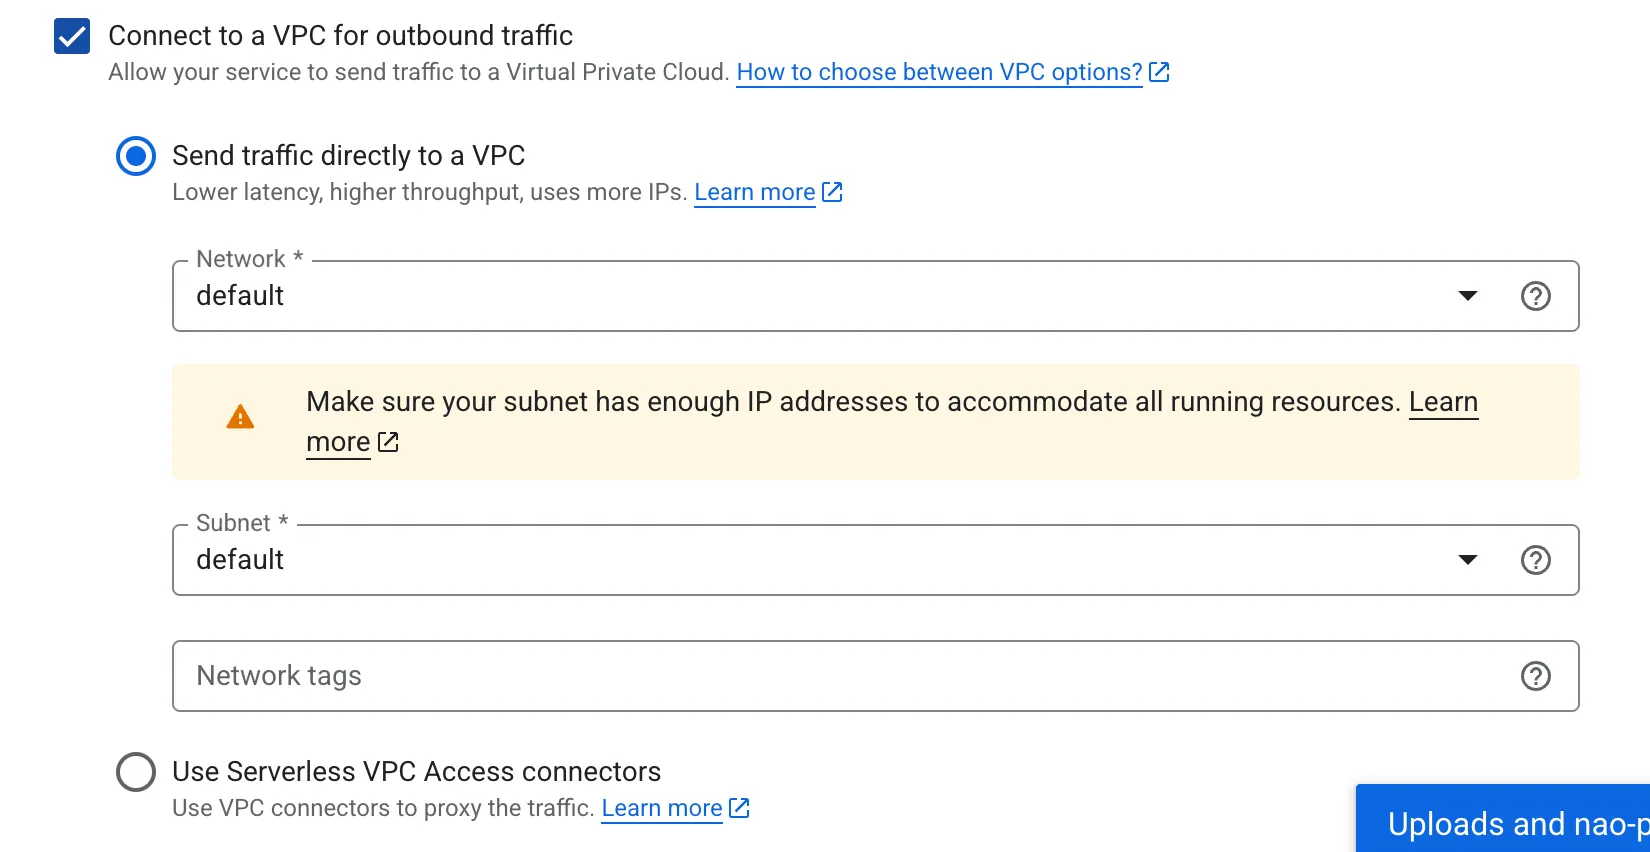
 **Networking:**
* Activate "Connect to VPC for outbound traffic" / "Send traffic directly to a VPC"
**Networking:**
* Activate "Connect to VPC for outbound traffic" / "Send traffic directly to a VPC"
 4. Deploy the service.
5. Once the service is live, copy the Cloud Run URL and update:
```bash theme={null}
BETTER_AUTH_URL=https://your-cloud-run-url.run.app
```
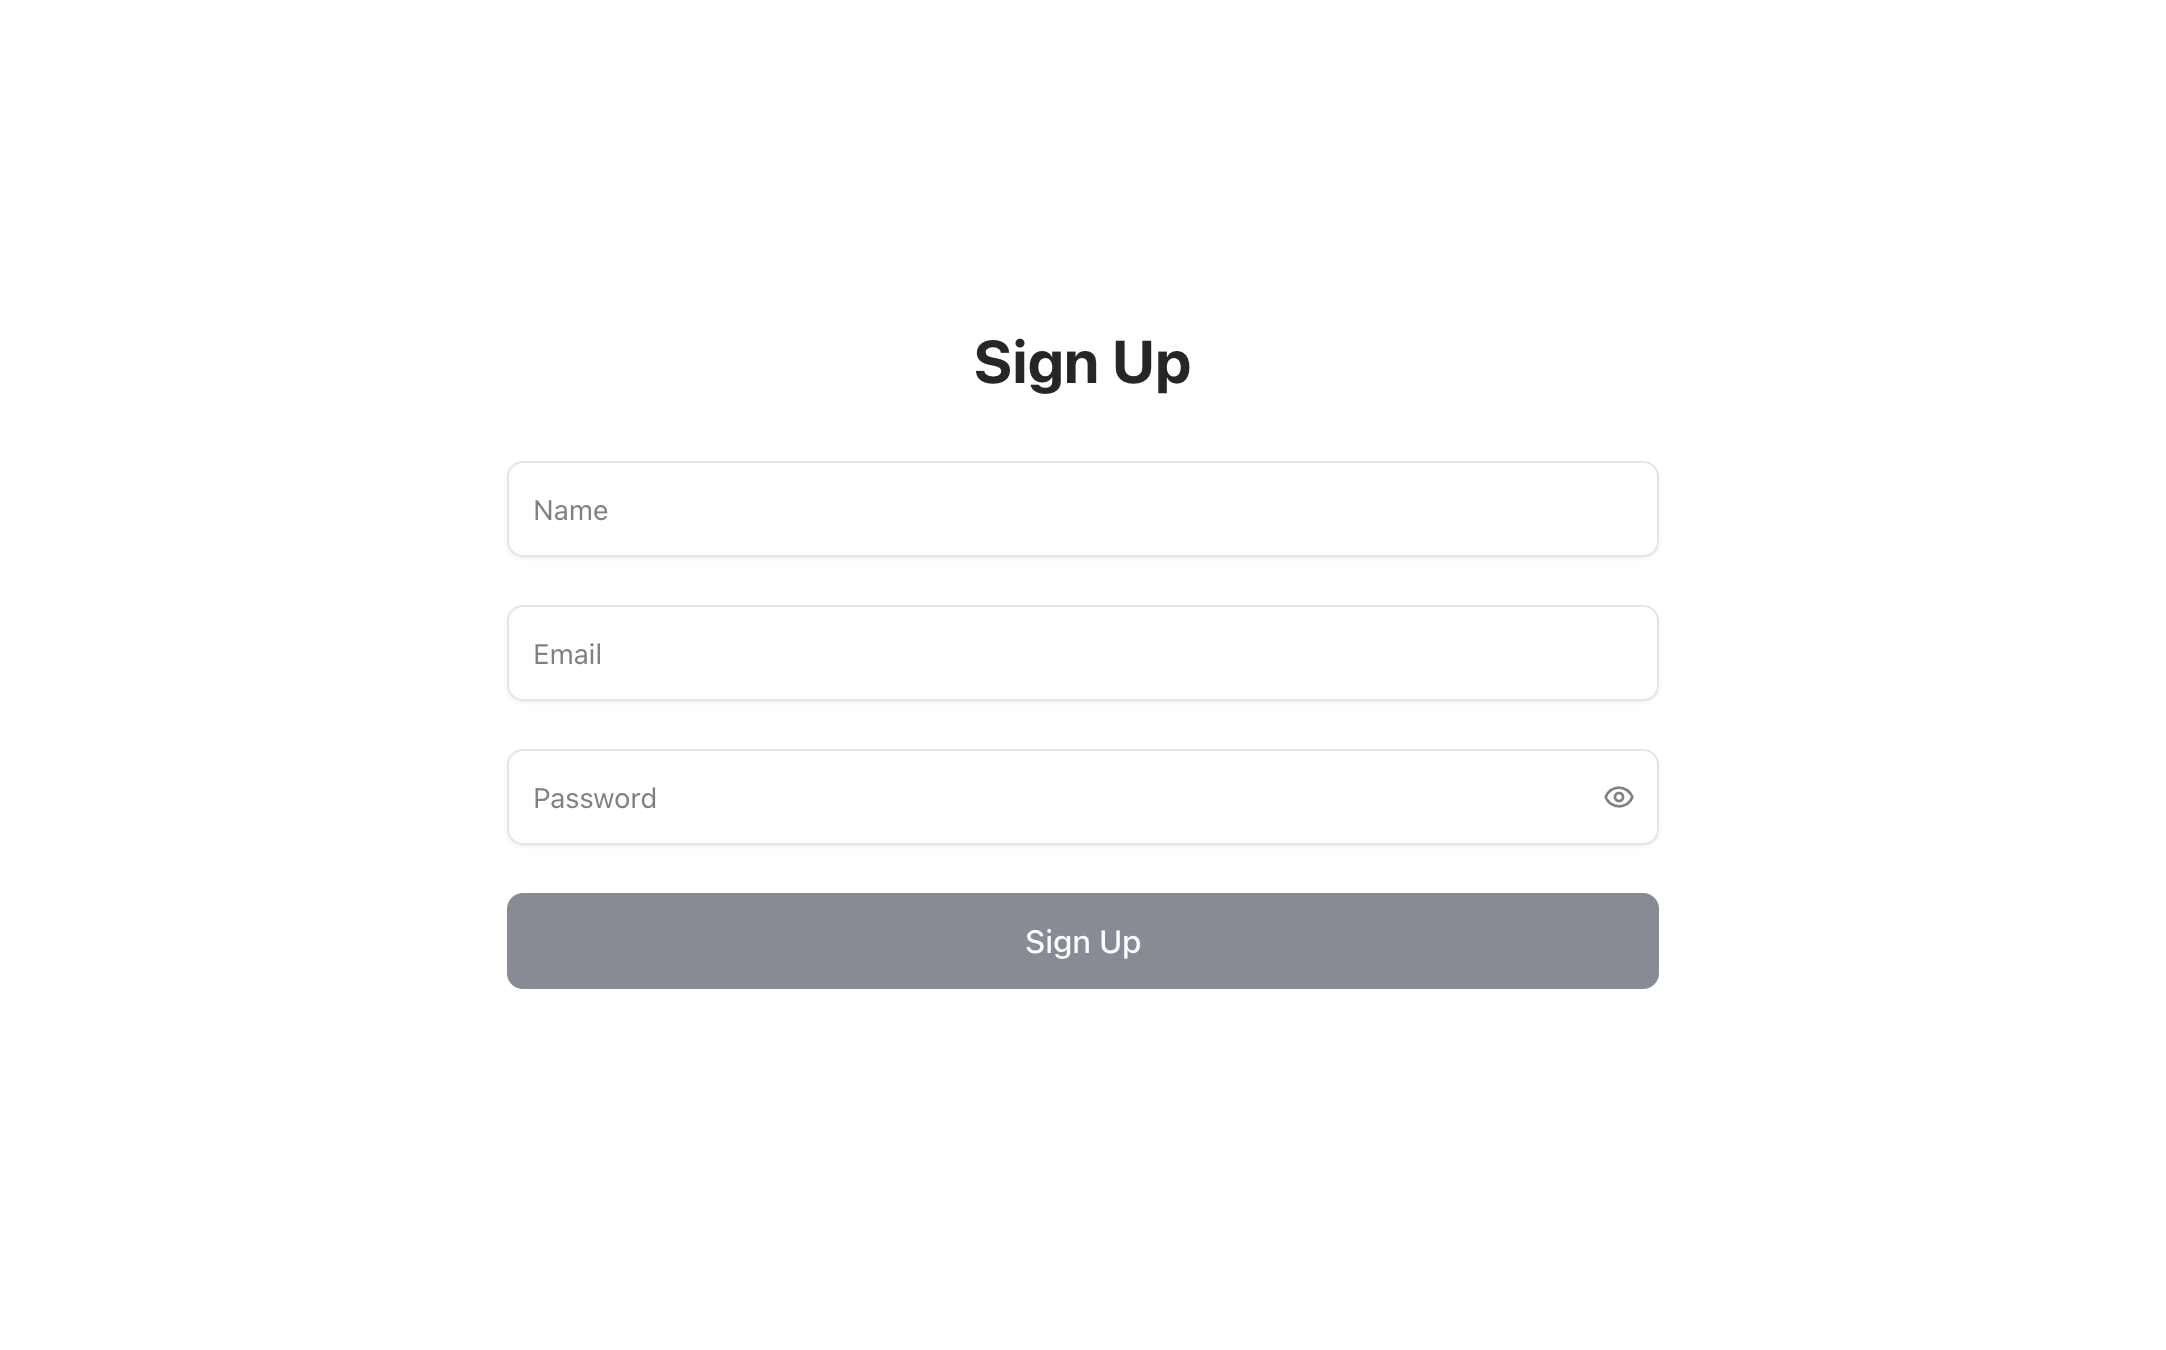
6. Open this URL in your browser, confirm that the nao chat UI loads, and complete the first sign‑up flow.\
At this stage, only the very first user can sign up directly; additional users are added and authorized later via the admin setup and user management flows.
4. Deploy the service.
5. Once the service is live, copy the Cloud Run URL and update:
```bash theme={null}
BETTER_AUTH_URL=https://your-cloud-run-url.run.app
```
6. Open this URL in your browser, confirm that the nao chat UI loads, and complete the first sign‑up flow.\
At this stage, only the very first user can sign up directly; additional users are added and authorized later via the admin setup and user management flows.
 7. Map a custom domain (optional)
If you prefer a friendly URL instead of the default Cloud Run URL:
1. In Cloud Run, go to **Domain mappings**.
2. Verify your domain.
3. Add the subdomain you want to use (e.g. `sky.naolabs.io`).
4. Add the required DNS records at your DNS provider.
5. Update `BETTER_AUTH_URL` to the custom domain, for example:
```bash theme={null}
BETTER_AUTH_URL=https://sky.naolabs.io
```
## Version update notifications
nao checks the latest release on GitHub and shows an amber notification at the bottom of the sidebar when your deployment is running an older version. The notification links directly to the release page so you can review what changed.
* Visible to **admin users only** - non-admins do not see the notification.
* The GitHub check is cached for 1 hour to avoid rate limiting.
* Works for both Docker and CLI deployments.
* If the GitHub API is unreachable (e.g. offline environments), the notification is silently skipped.
## Step 5: Customize your setup
### 5.1 Add users to your app
Once your chat UI is deployed, invite teammates and manage access from the admin interface.
Invite users, configure authentication, and manage access
If a user is locked out and you have not configured SMTP, reset their password from the machine that runs the deployment:
```bash theme={null}
nao reset-password user@example.com
```
The command updates the local nao database directly and prints a temporary password once, which the user changes after signing in. It needs no running chat server and no mail server. Accounts that sign in through SSO or OAuth have no password to reset and the command exits with an error. See [Reset user passwords](/nao-agent/chat/admin/setup#reset-user-passwords-with-smtp) for the email-based flow.
### 5.2 Automate nao sync with GitHub Actions
Automate `nao sync` so your context stays up to date in Git.
Set up GitHub Actions workflows to automatically sync your context
### 5.3 Connect a Slack bot
Expose your analytics agent directly in Slack so teams can ask questions where they work.
Connect your deployed agent to Slack channels
### 5.4 Enable Google OAuth for user sign‑in
To allow users to sign in with Google and control which domains can self‑register:
Configure Google OAuth for domain-based sign-up
### 5.5 Host several projects on this instance
Serve more than one project from the same deployment and domain, with a project switcher.
Run several nao projects on one instance with `NAO_MODE=cloud`
7. Map a custom domain (optional)
If you prefer a friendly URL instead of the default Cloud Run URL:
1. In Cloud Run, go to **Domain mappings**.
2. Verify your domain.
3. Add the subdomain you want to use (e.g. `sky.naolabs.io`).
4. Add the required DNS records at your DNS provider.
5. Update `BETTER_AUTH_URL` to the custom domain, for example:
```bash theme={null}
BETTER_AUTH_URL=https://sky.naolabs.io
```
## Version update notifications
nao checks the latest release on GitHub and shows an amber notification at the bottom of the sidebar when your deployment is running an older version. The notification links directly to the release page so you can review what changed.
* Visible to **admin users only** - non-admins do not see the notification.
* The GitHub check is cached for 1 hour to avoid rate limiting.
* Works for both Docker and CLI deployments.
* If the GitHub API is unreachable (e.g. offline environments), the notification is silently skipped.
## Step 5: Customize your setup
### 5.1 Add users to your app
Once your chat UI is deployed, invite teammates and manage access from the admin interface.
Invite users, configure authentication, and manage access
If a user is locked out and you have not configured SMTP, reset their password from the machine that runs the deployment:
```bash theme={null}
nao reset-password user@example.com
```
The command updates the local nao database directly and prints a temporary password once, which the user changes after signing in. It needs no running chat server and no mail server. Accounts that sign in through SSO or OAuth have no password to reset and the command exits with an error. See [Reset user passwords](/nao-agent/chat/admin/setup#reset-user-passwords-with-smtp) for the email-based flow.
### 5.2 Automate nao sync with GitHub Actions
Automate `nao sync` so your context stays up to date in Git.
Set up GitHub Actions workflows to automatically sync your context
### 5.3 Connect a Slack bot
Expose your analytics agent directly in Slack so teams can ask questions where they work.
Connect your deployed agent to Slack channels
### 5.4 Enable Google OAuth for user sign‑in
To allow users to sign in with Google and control which domains can self‑register:
Configure Google OAuth for domain-based sign-up
### 5.5 Host several projects on this instance
Serve more than one project from the same deployment and domain, with a project switcher.
Run several nao projects on one instance with `NAO_MODE=cloud`